
iPhone Local eSIM setup Guide
Step 1: Install Prepaid eSIM (for Korea, Vietnam, Japan, Thailand)

1. Go to Settings > Cellular > Add eSIM > Use QR Code
2. Scan the QR code (from another device or printout), or use the Camera app to scan it directly
3. Click Continue until activation begins.
4. Wait for the eSIM to activate (this may take a few minutes — do not exit).
.
* Install it in advance in a stable Wi-Fi environment before your trip.
* “Activating…” or “Unable to Activate eSIM” before departure is normal.
Step 2: Activate New eSIM (Secondary line – Travel)
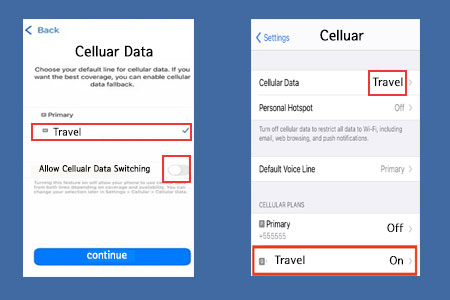
When you arrive at your destination, follow these steps:
1. Go to Settings > Cellular > select your new eSIM.
2. Turn on “Turn On This Line”.
3. Go to Cellular Data → select your new eSIM.
* Turn off “Allow Cellular Data Switching” (to avoid high roaming charges).
* Turn on your Primary line to use iMessage (see below).
* Restart your phone if it doesn’t work right away.
Using iMessage and FaceTime

1. Go to Settings > Cellular → set your Primary line as the default
2. Go to Settings > Messages > Send & Receive → select your Primary line.
3. Go to Settings > FaceTime → select your Primary line.
Related Posts
1. How can I fix my New eSIM if it’s not working after setting it up?
2. How can I fix both Primary & Secondary lines not working after setting up New eSIM?
3. How can I fix iMessage not working after setting up Korea eSIM?
What’s Local eSIM?
Local eSIMs are available for Korea (SKT, KT, LGU+), Vietnam (Vinaphone), Japan (KDDI), and Thailand (Truemove), offering stable and reliable local network connectivity. They are designed for use in a specific country, supporting data, calls, and text messages, and often include a local phone number.